Do you want to learn how to knit a Honeycomb Cables? Here you will learn how to do it step by step.
Hi there, here at Crochet fashion you will find great tutorials, and I have a perfect Honeycomb Cables pattern for you today, it’s a fast and easy tutorial, that was created by Rokolee DIY.
The Honeycomb Cables pattern is exactly what it sounds like it looks like a honeycomb it’s got a nice little interlocking pattern and it also is really light. It’s got holes running through it, if you turn it to excitement you can see those. So, it looks great for a blanket or a light sweater.
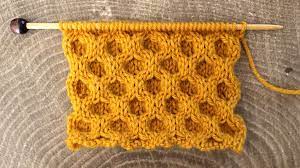
Kit a Honeycomb Cables stitch pattern, is a stunning curvy lattice that is often used for central panels on traditional knitted jumpers. Despite looking impressive, it’s actually a relatively easy cable pattern to achieve. I hope you enjoy giving it a go!
This symmetrical stitch is one of my favorites and i just love the 3d texture, you can use any yarn to knit this but I personally think it looks best using a chunky or super chunky yarn the first thing you need to do is cast on a multiple of 8 stitches.
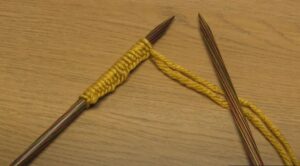
We used the long tail cast on but you could use any method. You might notice that i’ve cast on 20 stitches which isn’t a multiple, of eight and that’s because i’ve decided to add a garter stitch border on each side therefore the first two and last two stitches of every row will be knit stitches and will form the garter stitch border.
[activecampaign form=11 css=1]
Whether you choose to add a border or not you just need to keep in mind that the cable panel itself needs to be a multiple of 8 stitches wide.
So, for row one which represents the right side or the front of the knitting, you just need to knit all the way across then for row two which represents the wrong side or the back of the knitting you just need to purl all across the row. However, because we adding a garter stitch border we need to begin by knitting two stitches, then we purl until we’ve only got two stitches left, knit last two stitches and then row three is the first cable row.
So far have you liked the clear instructions? Watch the full tutorial in the video below.
But if you are that type of person, who likes to follow the creation process in detail. We have a FREE written pattern on Ravelry created by Louise Tilbrook.
Please tagg me in your photos on Facebook and post you final result on my group It’s
Join me and let’s create an amazing community, sharing crochet and experiences and tips only.
Happy Crocheting!!